Pages

Saturday, December 29, 2012

Fringe Festival T


This is a free pattern! Can you believe it? It is Hot Pattern's Fringe Festival Shirt and you can download it here. It is an easy-peasey knit shirt - I know my name is Stacie and I am a knits junky. I haven't sewn a knit in 1 day.  

Now I do have an ugly picture. It was taken in my sewing/my husband's storage room. Stop judging me!


Yes, it is a weird, dark shot, but I had to show it. This is after I hemmed it the first time. It reminded me of one of those men's Victorian era striped swim suits. Funny, yes, but not the look I was going for. I wound up cutting a straight hem as opposed to the cool curved one. I cut off about four inches on the long parts of the hem and like it much better now. Next time I make it I will shorten the shirt via the pattern.


I also skipped the front and back center seams. I was working with stripes and wanted the least chance of screwing them up. Also, the scarf part is raw edged. That is fine, but next time I may cut out two and sew them together to make it a bit thicker and hide the raw edges.


Matchy, matchy stripes! Oh yeah!


I had to show a back shot. There isn't much going on here. You can see the collar is just floppy, but I'm OK with it. 


This was an easy win, and a free pattern! Now where did my eyebrows go....


Wednesday, December 26, 2012

Long leopard cardigan


This was an easy win. I made McCalls 6408 again. I used a leopard sweater knit from Fabric.com. This was the first time I have sewn with it, but I really enjoyed it. The top is super soft and nice and warm.


I made version A without the ties. I like ties, but I wanted to keep it simple with this print. 


I am very impressed how well I did sewing knits on this one compared to the last time I made this pattern. 


Everything went in clean and simple. I mostly contribute that to knowledge I can carry over from my Craftsy Sewing With Knits class. I swear it was one of the best investments I ever made.


Check out my nice clean double stitched hem! I did double needles on the sleeves and the bottom of the cardi that doesn't go with the band around the neck which brilliantly hems itself.


I love how the back looks. It lined up very nicely on the fabric.

Monday, December 24, 2012

Christmas Quilt


It has been hard keeping this quilt to myself, but I didn't want to blog it until Mr. Thinks He Can received it. He did like it very much.


This quilt is a Piece of Cake 3 pattern using a layer cake from Basic Grey's Little Black Dress. I quilted it by stitching in the ditch between the five vertical rows as well as around the = sign that is within each block. It was a quick sew, and gave excellent results.


The edges were hand bound using the grey herringbone pattern.


I backed it with a black and white damask flannel I got ridiculously cheap at Joann's black Friday sale. 


And this is what the quilt will mostly look like- wadded up with a dog on top. She was very jealous during my hand sewing part of the quilt and would lay on top of it so she could get the attention instead of it. In the process she began to think of it as her own. When I put the quilt in a gift back yesterday she whimpered and has been knocking over the bag every chance she gets. As soon as my husband pulled it out she promptly hopped on it and went to sleep. I take that as a sign of a good quilt. 

Merry Christmas everyone!


Tuesday, December 18, 2012

Noodle wreath


One of my students made this today. I teach in a life skills class, so I have the severe and profound kids with disabilities. And one of them made this freaking adorable wreath! He was so proud of himself. There is minimal sewing to it, but I thought I would share the idea for other teachers or parents.


Take a pool noodle (I got mine for 50 cents) and bend it to make a circle. Fasten it together with packing tape, or some such fastener.


Sew together 5 lengths of fabric cut 2.25 inches by width of fabric at the ends to make one long continuous strip. Wrap the strip around the noodle to cover it. We actually attached our fabric with a stapler because it worked so well on the noodle.


Bask in the glory of all these cute wreaths. The various sprays I got two for a dollar at the dollar store as well. All we did was stick them through the material and noodle to attach them. Trust me, you have to love a project in my class with no hot glue involved!


Wednesday, December 12, 2012

Baby Burp Cloths - the tutorial


I don't believe I ever published this here:

I was at a friend's house recently and she had some really cute burp clothes someone had given her. Her cloths were a cloth diaper on one side and a piece of fabric on the other. In the past I have just used pieces of fabric on the end or as accents when making a burp cloth. I thought hers looked great and would be even easier to make! Here is what I did:
Image
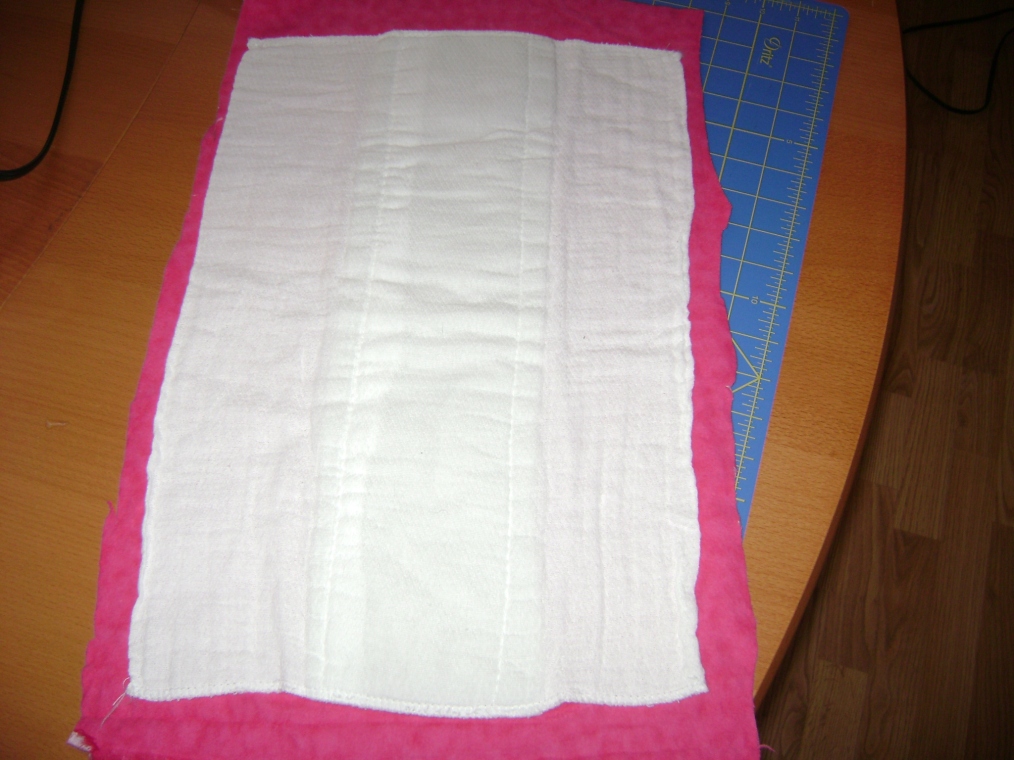
I placed a cloth diaper right sides together with a piece of my flannel. I did embroider my fabric first on this one, so I made sure that was centered. I made my pink fabric larger all around because the diaper is such a loose weave it is hard to keep it straight. The extra room gave me room to maneuver a bit.
Image
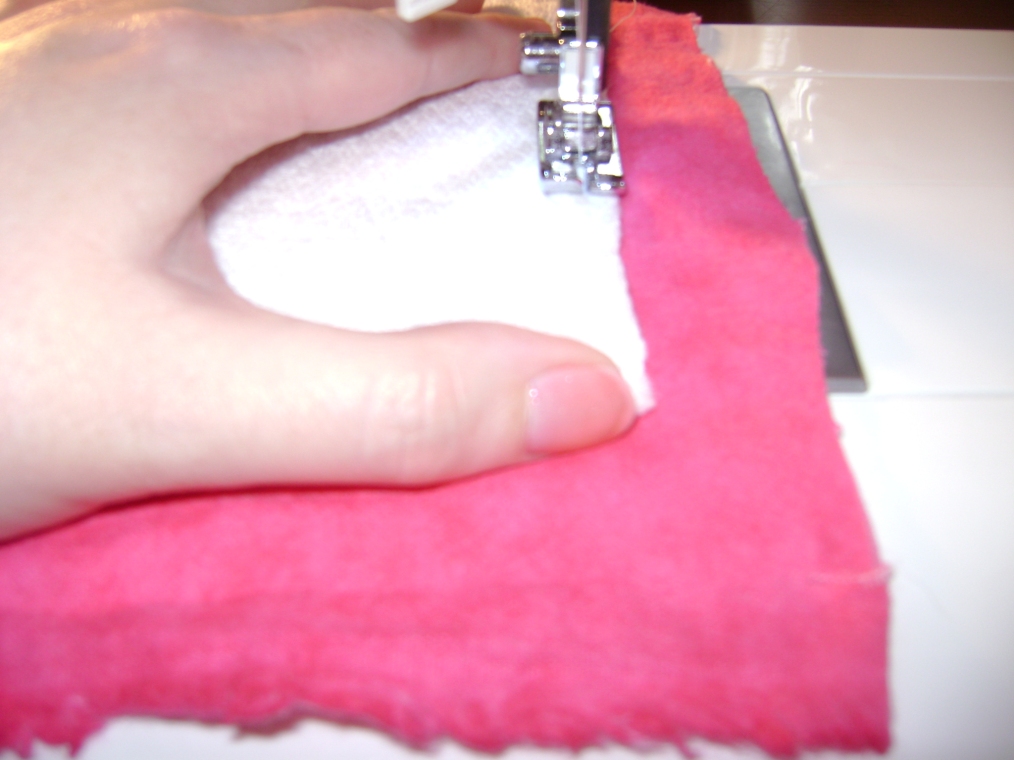
Top stitch around the edge of the diaper, trying your best to keep the diaper from shifting much.
Image
Leave an opening along one side a few inches wide to pull the burp cloth right side out.
Image
Trim your excess from around the edge leaving a good half an inch outside the opening you left. Pull your burp cloth right side out.
Image
Press your cloth. If you embroidered yours be mindful not to press your threads. Press the extra fabric you left for your opening into the diaper and make sure it is even with the sides of your cloth.
Image
Top stitch around the edges of the diaper. The middle can be thick, so I slowed down on the ends when sewing through there. I chose to stitch in the ditch along the lines on either side of the middle portion of the diaper. My friend had hers stitched across the diaper so it folded in thirds. I think as long as you stitch it to keep it from shifting it is fine.
Image
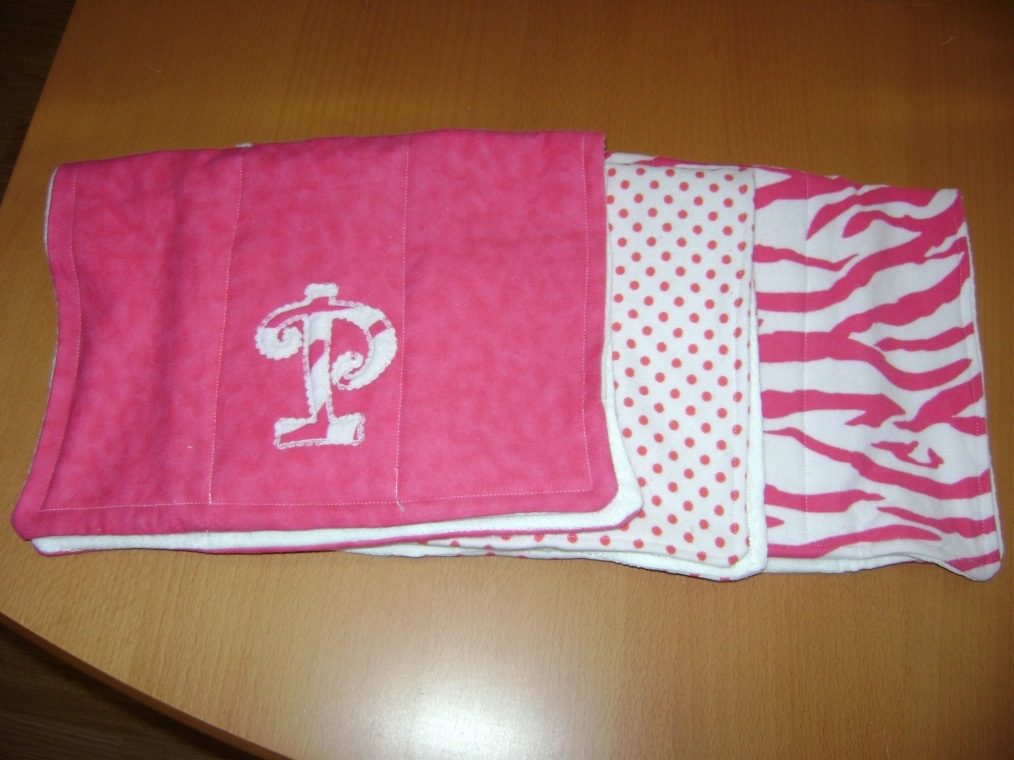
I made three cloths, one out of each of my three coordinating fabrics. I only embroidered the solid pink one.
Image
 Here is how the baby gifts look all together. So cute!
Note 2 our Readers:  Find even more adventures from Stacie at her personal Sewing Blog

Burp cloths: remix

I had a friend tell me she got a lot of pretty burp cloths at her baby shower, but in the end they mostly use towels because they work better. I thought, "I can do that," and here we are.


These burp clothes are made the same way as my old ones. I just used fat quarters. One fat quarter of cotton and one fat quarter of terry cloth. I got the cotton fat quarters at the quilt festival from the Cabbage Rose booth. I love the blue and yellow. Does anyone know what line they are from? Anyway, they were in the clearance bin, so I bought a handful.


Since I did not use a cloth diaper, I went ahead and sewed a line down the thirds to make for easier folding. You can kind of see it on this print. I'm 99% sure it is an Amy Butler.


All I can say is gorgeous. I love these fabrics. They don't match, but they are each so pretty. I wish the blue one would show up better. The colors are amazing.


And for the shower I just wrap them in a scrap-ribbon and put a card in it. Perfect!


Saturday, December 8, 2012

Christmas aprons


I love this apron! Actually there are two of them, because it is as easy to make one as two. I have made a couple of versions of the ruffle apron in the past, but it is perfect for Christmas.


Here is a front close up.

 
I love the back. I added a tag and pieced the back to give it a modern quilt look.

 
I added some vintage lace from one of the estate sales to the waistband as well as a ribbon. It just adds pizazz.

Here is one of the packages of the lace. There were three. It was originally 29 cents for two yards marked down to 25 cents. I had to cut off where the tape yellowed, but I think it turned out really cute. I wove the ribbon in because it just made sense.
 
Now on to the 15 minutes a day. I have been trying to squeeze in 15 minutes of sewing each day and have been quite successful. It keeps my projects frech on my mind. I also find that when I sit down for 15 minutes I really enjoy knowing I can stop. There is no pressure to complete a huge project or finish a garment start to finish. I also find that once I am sewing, I usually keep at it for quite a while. It has been a winning idea for me.


Sunday, December 2, 2012

Christmas Sewing has commenced!

I love how this little dish towel and pot holder set turned out. I like it so much everyone I know in the whole world might get one. OK, maybe not, but the list definitely got longer.


I bought a couple of yards of Christmas fabrics this year. I had batting, Insul-bright and scraps on hand, so I figured kitchen stuff was the way to go. Everyone uses kitchen stuff, right? Especially near the holidays when you are making treats!


I started with the potholder, which is about 10 inches square. It is really just a tiny quilt. As you can see I got creative in my quilting. I still need to hand sew the binding to the back, but that will be easy. Sewing my binding is my favorite part of any quilt.


On the towel I just winged it. I bought plain white dish towels from target and just decorated the end with a ruffle and a strip of potholder matching Ho! Ho! Ho! fabric. 


I am pretty pleased with how it turned out. I am making a ruffle apron to match this set, and now I think I need to make a few more sets too! Merry Christmas Sewing!


Wednesday, November 28, 2012

Your 15 minutes are up!


I have been following the 15 minute idea that Tilly has been talking about. I was working on my quilt backing, as seen under my assistant. Perfect for the man quilt, right? Anyway, my phone went off at 15 minutes and my assistant promptly walked in, sat on the fabric and gave me "the look." What would I do without my little regulator? Do you think she is thinking, "Do my ears look fat?" I just love that dog!

Tuesday, November 27, 2012

Sewing for a Cause: Sewing Machines & Life Skills for CSEC

Have you ever had a person in your life that just being around them makes you want to do great things and be a better person? Jenny Gabriel is one of those people for me. She is a fellow seamster and taught me probably 90% of everything I know. I am so excited for her because she has launched a program with Freedom Place which helps commercially sexually exploited children (CSEC) get back on their feet. She is teaching the children to sew!  Jenny has been coming up with great ideas and projects for the girls, and one of her ideas is that each girl that makes it through the program will get to keep her sewing machine. I think it is a brilliant idea and a huge confidence builder to have such a useful skill. Jenny has just launched a Go Fund Me page site to help her get her program going. I know it is the holidays and money is tight, but if you would like to learn more about her fantastic program please visit her page.

In the mean time I am back to working on a project for one of my classes and hope to get some sewing done this week to report in on! 

Monday, November 19, 2012

I seriously finished the quilt top

Yes, the one that I blogged about cutting out about four hours ago. It's done!


I know, it is a crappy iPhone picture, but it is proof it is done. I have two suggestions:

1. If you ever thought about making a quilt Thimble Blossoms Piece of Cake 3 is all straight lines and easy blocks.


2. Serging a quilt is awesome and super fast! Check out how nice that back looks! 

Now I'm off to work on state testing. If you hate soap boxes, go ahead and quit reading while I drag mine out and dust it off. I work with severe and profoundly disabled kids in the state of Texas. First, Texas tests all children to death and is being sued by multiple districts over it. The federal government says kids have to be tested four years between third and eleventh grade. Texas tests every year in multiple subjects. Kids lose days of learning to days of testing and companies that make supplemental testing materials get big bucks.  Second, as a teacher of middle school kids, some of whom cannot recognize all the letters in the alphabet, I get to write and develop the tests myself. Plus my kids don't use pen and paper, so I have to create task driven tests. Here is the math:

1  6th grader - 2 subjects
3 7th graders - 3 subjects
4 eighth graders - 4 subjects
Each subject = 4 tests = I have 108 tests to write and get approved before January.

They are tested on things like identifying 2/4 (no, not half, 2/4). Which would be the more valuable term to know, really? HALF! That is just one of many things they are tested on that I just don't find as useful as other things. That means less learning things like their phone numbers or how to use a microwave. Gah! It is very frustrating. OK, off the box!

Finally, a man quilt

I am so tired of hearing about how my assistant got a quilt for Christmas, but Mr. Thinks He Can did not. As a quick reminder, this is the quilt I made for Brindy.


It has hot pink squirrels on it and purple hedge hogs. It became in experiment in the absurd and somehow worked out amazingly. In the end, she loves it, does not share, takes complete ownership, and even if it had turned out horribly, would have felt the same way. For my second quilt ever she was a perfect giftee. A grown man would not be swayed by such adorable gimmicks.


I saw this quilt at quilt market ad thought it would be a perfect man quilt. Nothing cutesy, but still pleasant. I felt this would be perfect. It was sold as a kit that contained a layer cake, background fabric and binding from Moda's Basic Grey Little Black Dress Line. It is very menswear inspired. The pattern is Thimble Blossoms's Piece of Cake 3. I have never really been drawn in by precuts like a layer cake or jelly roll, but I am totally won over now! 


I cute out this whole quilt in 15 minutes. Also, Holly taught me that sewing a quilt top on a serger is super fast and easy, and I'll be danged if she isn't right. I love this pattern and this quilt! Updates to come soon! I'm thinking about backing it with minky. Has anyone ever done that? Yay or Nay?

Tuesday, November 13, 2012

Art Gallery shirt

This post is going to be all over the place. I have made this pattern a few times, but each time I try something new.


This is Simplicity 2599 which I made with some Art Gallery fabric I bought at the Quilt Festival. It is quilting cotton but has such a nice feel to it. I loved so many of their prints! I made the usual short waist adjustment and cut the back on the fold to skip the button since it is unnecessary.


On this one I removed quite a bit of ease out of the sleeve cap after I was inspired by Green Apple's tutorial on how. What I did find though is having less sleeve brought my shoulder down a little bit more, so next time I will cut my shoulder in a bit, but I do like the way the cap fits.


This is how the sleeve looked on my last sleeved version. It was pretty dang puffy, but you can see it isn't pulling the shoulder down like the newer version.


I also hemmed the sleeves a new way. I serged my raw edges then used Steam A Seam Lite to hem them after I saw the post on 3 Hours Past the Edge on the uses of fusible webbing tape. I plan on being an abuser, because this method worked quite nicely and was super easy. It also allowed me to leave the length in my sleeves which came out a bit short after the sleeve cap experiment. 

So I love the shirt and please be sure to check out Green Apples and 3 Hours Past for the awesome tutorials. Also two of my students told me (or signed) they liked my shirt. I have eight students total, so either it really looks that good or they were just glad to see something else make the rotation!